Thursday, 12 September 2013

Flex HTML ToolTip Component

To enhance the normal tool tip functionality to have html style break/ font weight for a portion of string:

You need to create a action class like this:
package com.philip
{
import mx.containers.*;
import mx.controls.Text;
import mx.controls.ToolTip;
import mx.core.*;

public class HTMLToolTip extends ToolTip
{
public function HTMLToolTip()
{    super(); }

override protected function commitProperties():void{
super.commitProperties();
textField.htmlText = text;
}
}
}

to use this set this in your main component, call this function on creationComplete:

<![CDATA[
import com.*;
private function init():void{
ToolTipManager.toolTipClass = HTMLToolTip;
myBtn.toolTip = "this is HTMLToolTip."

]]>


The original post has strong tag but that didn’t work for me in Flex 3.5 SDK worked fine


Link to the original post

Wednesday, 4 September 2013

How to configure Railo – Tomcat – Apache on MAC Lion Mountain 10.8

Last week I updated my operating system from Snow Leopard  to Lion Mountain 10.8, system has upgraded itself.

Only two problems I faced:

1) Little Snitch got removed (V 2.2), I had to buy Licence for upgrade of version 3.02 – Lion cost me more :(

2) I had ColdFusion 9.01, which stopped working as Lion upgrade had reinstalled Apache removed old httpd.conf and httpd-vhost.conf files (actually renamed them as httpd.conf~previous.

I tried to move virtual sites from old to new but it didn’t work.

Web Sharing option got removed from System Preference - To get it back I found this post which provides a tool to get it in Sys Pref under Other:

Explanation, good article to read: Restore Web Sharing in Mountain Lion

Get the tool from here: WEB SHARING IN OS X MOUNTAIN LION

I made few changes to Apache config files, by default it uses web server document folder here:

/Library/WebServer/Documents

I have changed this and few other settings in httpd.conf (/private/etc/apache2/)

1) Find ServerAdmin and change email address to yours one (around line no 153)

2) Find ServerName and change it to cfdev also add following in hosts file (/private/etc/)

127.0.0.1 cfdev  (now you can get to your webserver by localhoost/ cfdev/ 127.0.0.1)

Make sure you uncomment this line (at line no 481) Include /private/etc/apache2/extra/httpd-vhosts.conf

3) create a folder sites or whatever name you waant to give at root level

4) Find DocumentRoot (line no 169) and change it to “/sites”

5) Find < Directory and change it with “/sites”

6) Open file httpd-vhost.conf from /private/etc/apache2/extra/

7) Uncomment NameVirtualHost *:80 (Line no 19)

8) Add following virtual host (default) site


DocumentRoot “/sites”
ServerName cfdev
DirectoryIndex index.html


9) Add / Create index.html in /sites folder as a place holder

10) sudo apachectl restart (to pick-up the changes

now open browser and browse http://cfdev or http://localhost and you should see your default web page

Railo Installation:

Download your railo installer from here

Scroll down and pick MacOS installer infront of Railo Server with Tomcat 7 title

Open it up and follow the default steps:

It will normally Install under this location and picks port 8080 – /Library/Railo/tomcat/

now if you browse http://localhost:8080/ you should see the tomcat page

1) Open web.xml from tomcat/conf folder

Add following at around line 422 (This will help if you use CFWheels frame-work


GlobalCFMLServlet
/rewrite.cfm/*


2) Open server.xml from tomcat/conf

3) go to line no 90 and un comment following:


This will help us to use apache server on port 80 to create virtual sites.

at around line 123 you will see default website for this Tomcat server

create a folder under /sites folder – which will be your first local site say – firstSite

inside the folder create index.cfm

now create a virtual site in server.xml like this: (above
)
unpackWARs=”true” autoDeploy=”true”
xmlValidation=”false” xmlNamespaceAware=”false”>


save the file and restart the server (Tomcat):

4) open terminal window and go to /Library/Railo/tomcat/bin

run following command: sudo sh shutdown.sh (to shutdown the server)

Now run this command to start it: sudo sh startup.sh

5) add following in hosts file: 127.0.0.1 dev.firstsite.com

now browse http://dev.firstsite.com:8080 and you will see your first site index.cfm running

6) open httpd.conf from /private/etc/apache2/

add following (Thanks to Anuj Gakhar this post)


Allow from 127.0.0.1


ProxyPreserveHost On
ProxyPassMatch ^/flex2gateway/(.*)$ ajp://localhost:8009/flex2gateway/$
ProxyPassMatch ^/messagebroker/(.*)$ ajp://localhost:8009/messagebroker/$1
ProxyPassMatch ^/(.+\.cf[cm])(/.*)?$ ajp://localhost:8009/$1$2

now open httpd-vhosts.conf from /apache2/extra/ folder and add virtual site (key to this set up is you need to add virtual site pointing to the same folder with same url under both servers)


DocumentRoot /sites/firstSite
DirectoryIndex index.cfm

AllowOverride All
Order allow,deny
Allow from all
Options +Indexes

ErrorLog firstsite.error.log
LogLevel warn


restart your apache server and

browse http://dev.firstsite.com  and you should see your site running on port 80

How to resize and crop Image Using Coldfusion script

I had requirement on my site www.eventaway.com  to resize Image after uploaded by user in two sizes one for view page and one as thumbnail, I found some script on web and improved it to fit in my requirement. here it is. I expect this code will reside in a CFC function


var l = {}; // local struct

/* Read file  and we will resize and crop it to make 200×200 */

l.img = ImageRead(“path of the image to be resized”);

l.resizeOriginalFlag = 0;
If( l.img.height GT l.img.width )
{
If( l.img.height GT 200)
{
ImageResize( l.img,’200′,”);
l.resizeOriginalFlag = 1;
l.fromX = l.img.Height / 2 – 100;
ImageCrop(l.img,0,l.fromX,200,200);
}
}
else if( l.img.width GT l.img.height )
{
If( l.img.width GT 200 )
{
ImageResize( l.img, ”,’200′);
l.resizeOriginalFlag = 1;
l.fromY = l.img.Width / 2 – 100;
ImageCrop( l.img,l.fromY,0,200,200);
}
}
else
{
If( l.img.height GT 200)
{
ImageResize(l.img,’200′,”);
l.resizeOriginalFlag = 1;
ImageCrop(l.img,0,0,200,200);
}
}


source=”#l.img#”
destination=””
overwrite=”yes”>

<!— <cfdump format="”html”" output="”/sites/resize.html”" var="”#cfcatch#”"> —>


Where do you need to use javascript MV* framework

I like following while I was reading an article on javascript frameworks: I thought it is worth repeating:

So, where will you likely need an MV* framework and where won’t you?

If you’re writing an application that will likely only be communicating with an API or back-end data service, where much of the heavy lifting for viewing or manipulating that data will be occurring in the browser, you may find a JavaScript MV* framework useful.

Good examples of applications that fall into this category are GMail and Google Docs. These applications typically download a single payload containing all the scripts, stylesheets and markup users need for common tasks and then perform a lot of additional behavior in the background. It’s trivial to switch between reading an email or document to writing one and you don’t need to ask the application to render the whole page again at all.

If, however, you’re building an application that still relies on the server for most of the heavy-lifting of Views/pages and you’re just using a little JavaScript or jQuery to make things a little more interactive, an MV framework may be overkill. There certainly are complex Web applications where the partial rendering of views can* be coupled with a single-page application effectively, but for everything else, you may find yourself better sticking to a simpler setup.

Sunday, 11 November 2012

How to Write Long tweet and facebook status update using TweetFace

How to write Long tweet using www.TweetFace.co

Visit www.tweetface.co home page and click on the button "Sign in with Twitter" (Black Arrow)

This will take you to next screen, if you are logged in to Twitter, it will present following screen, which ask you to give permission to TweetFace to post tour tweet on Twitter, when you post from TweetFace. Click on to Authorise App button


otherwise will show the next screen.

here TweetFace send your request to Twitter on twitter website, Twitter present you a login screen, login with your Twitter username/ password. TweetFace don't have any login screen, It doesn't save your username/ password.

After successful login you will come to this screen:
Here Arrow 1: shows your details from Twitter - No of Tweets/ Followers/ Following/ Fav etc
Arrow 2: Shows you are connected to Twitter, if you have FaceBook account, then you can login using FaceBook and Tweetface can post on both social media platforms in one click.
Arrow 3: click to go to the next page where you can write/ format your post


To login to FaceBook after you logged in to twitter, click the "Signin with FaceBook" button as in following picture.

Now you will see the both radio button shown as selected.

Write screen: click near arrow and start typing
After typing the text select the text and click on font drop down and pick the right font for you, click on size and pick the font size as shown in next Image.

Now pick the colour to make it beautiful.

If you want to upload image, you can learn it through the video, which is under this page:


You can also add the video link (You tube link is only allowed) check the Arrow no 1 in following Picture.
Arrow no 2- where you can make selection, if you want to be specific, where you want to post to go.
When you are done, you can click the Post button - Arrow 3 to send your post to selected options.


The post procedure is almost similar on Mobile, only difference is, only one image can be attached to post and you can't place it at a specific location in the post. 

After posting the post, you will come to this screen.
in this page you can see few buttons at the bottom of your post.

Facebook button if you are logged in to FaceBook
reTweet button, you can re-tweet the post 
tweet button which opens Twitter window to RT the tweet
Follow button if you are logged in as Twitter user

On right side where red text is "Write new post", if you are logged in as Twitter user, you can click on "View My Tweets and you will be taken to following page, which shows all your tweets from Twitter.
View Time Line will show your timeline from Twitter
View Mentions will show all your mentions.

From everywhere you can Reply and RT those tweets of Twitter too.


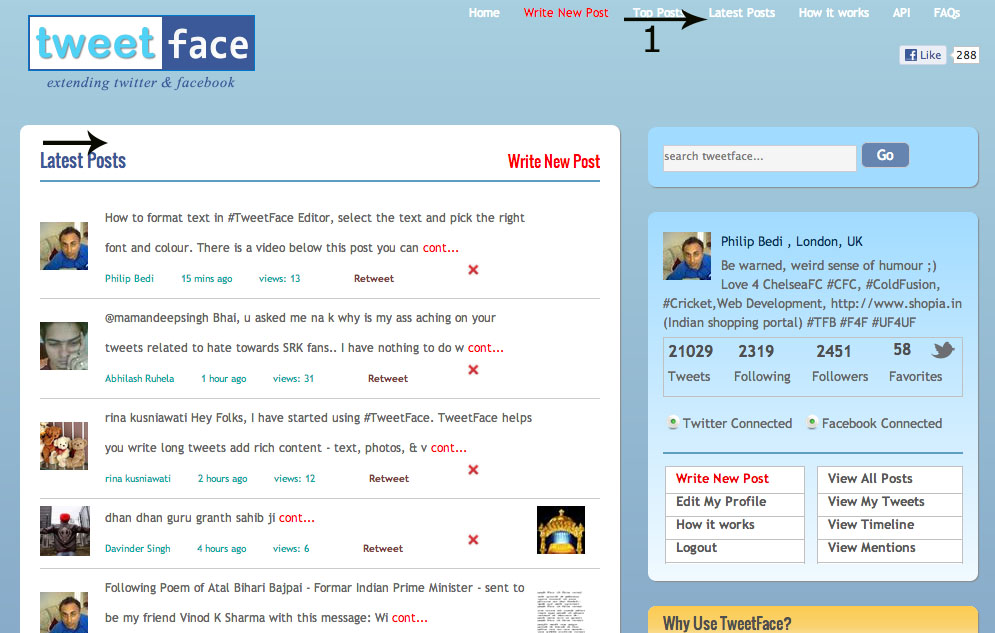
Top links as in following picture, 
1) Home, will take you to your post on this sites,
2) Write new Post
3) Top Posts, - Highly viewed post on this site
4) Lates Post - Latest post on this site by any user
5) How it works 
6) We offer API for our functionality - available for Mobile/ Desk Top Apps
7) FAQ - frequently asked questions


Tuesday, 29 June 2010

HTML5 and touch phone devices

Here is the first (I think) framework for Mobile phone (touch) devices, I need to explore more on this and will post in detail soon.

http://www.sencha.com/

Sencha Touch allows your web apps to look and feel like native apps. Beautiful user interface components and rich data management, all powered by the latest HTML5 and CSS3 web standards and ready for Android and Apple iOS devices. Keep them web-based or wrap them for distribution on mobile app stores

Friday, 18 June 2010

Abobe Flex ArrayCollection Sort

This is a inbuilt functionality, which I used to sort the ArrayCollection.
I just wanted to put it here so this can be handy for my reference, ;)

public var availableRegions:ArrayCollection = new ArrayCollection();
/* Create the SortField object for the "data" field in the ArrayCollection object, and make sure we do a numeric sort. */
var dataSortField:SortField = new SortField();
dataSortField.name = "name";
dataSortField.caseInsensitive = true;

/* Create the Sort object and add the SortField object created earlier to the array of fields to sort on. */
var regionDataSort:Sort = new Sort();
regionDataSort.fields = [dataSortField];

/* Set the ArrayCollection object's sort property to our custom sort, and refresh the ArrayCollection. */
availableRegions.sort = regionDataSort;
availableRegions.refresh();

Load Testing using JMeter

This week I got chance to do load testing using JMeter for the work we have done @ 2nd Byte

This was the first time I used JMeter, which is an open source and quite impressive.

It's can't record user's click like some of the paid load performance check tools but it still does the job.

Here is the link for the Download: JMeter

Its very easy to use.

Give it a try, its worth trying it.

Enjoy

Action script Date Data Provider

I had a requirement to show 2 drop downs for From and To selection of months and year, values like this:

Jan, 2010
Feb, 2010 and so on

And I used the following class to get this working like this.

Based on the class from
http://flexdateutils.riaforge.org/

public function getListOfMonthsAndYear(date:Date,noOfMonths:int = 12):ArrayCollection
{
var monthArr:ArrayCollection = new ArrayCollection();
var obj:Object = new Object();
var dt:Date = new Date();
var n:int = 0;
for (var i:int = noOfMonths; i >= 0; i--)
{
n++;
dt = DateUtils.dateAdd(DateUtils.MONTH,-i, date);
obj = new Object();
obj['label'] = DateUtils.dateFormat(dt,'MMM YYYY');
obj['data'] = DateUtils.dateFormat(dt,'YYYYMM');
obj['no'] = n;
monthArr.addItem(obj);
}
return monthArr;
}

Then I created filtering on the second drop down to remove all the entries which are not relevent, like if you select in your From combo, say Month March, 2010 then you don't want user to select Jan, 2010 in To combo as that would be wrong.

Here is the filter I created on Array Collection:

/**
* From Month Change Handler
*/
private function onFromMonthChange(event:Event):void
{
var comboBox:ComboBox = null;

comboBox = event.currentTarget as ComboBox;
this.currFromMonthNo = Number( comboBox.selectedItem.no );
this.monthToDP.filterFunction = this.toMonthFilter;
this.monthToDP.refresh();
if (this.monthToDP.length > 0) this.monthsTo.selectedIndex = 0;
this.criteria.monthFrom = this.monthsFrom.selectedItem.data;
this.criteria.monthTo = this.monthsTo.selectedItem.data;
}

private function toMonthFilter(obj:Object):Boolean
{
return Number(obj.no) >= this.currFromMonthNo;
}

Actually I used a trick to store number starting from 1 to end of the list in both collections and removed the items with the no's above the selected one from To combo list

Enjoy

Adobe Flex Combo box Binding Bug

I was working on one project at 2nd Byte and hit this problem of Combo Box's data provider not being updated intermittently.

I came across one post which described the bug in SDK 3.5 (it was in previous SDK's as well.

I was doing like this:
[Bindable] public var comboDP:ArrayCollection;

myComboBox.dataProvider = comboDP;

and this wasn't getting updated values and had to do like this to get this working:

myComboBox.dropdown.dataProvider = comboDP;


Link to the post

Enjoy

Yahoo rejects emails

My Friend Anuj hit a problem of his clients emails not being delivered to Yahoo users. and I found few links which could be a help if you hit the same problem.

Link 1

Link 2

Link 3

Link 4

DomainKeys

This looks like a Marathon or Herculean task to sort this thing out.

I thought putting it here might help someone or me at some point.

Friday, 11 June 2010

SQL makes decision for you - strange

I ran into a strange MSSQL behaviour.

I wanted to do some calculation and output it in my application like this:

Declare @aFlaot float

set @aFlaot = 3*1/2

select @aFlaot aFlaot

From above I was expecting a float value as I was storing it in a float type variable but it was returning 1 ( as an integer)

And when I tried following I got back right value with correct decimals

Ex 1)

set @aFlaot = 3*1.0/2

select @aFlaot aFlaot

Returned 1.5 (as expected)

Ex 2)

declare @aVal float
set @aVal = 1

set @aFlaot = 3*@aVal/2

select @aFlaot aFlaot

Returned 1.5 (as expected)

What I understand is SQL decides on the basis of values you are using in your calculation not the container type you are using.

Friday, 4 June 2010

Few links to get going on Ajax or Flex - Swiz

Flex framework - Swiz
http://www.briankotek.com/blog/index.cfm/2009/1/8/Using-Swiz-Part-1-Initial-Setup

JasonLint Validator
http://www.jsonlint.com/

Tuesday, 1 June 2010

Coldfusion transaction error

I came across very weird error from one of my cold fusion cfc page, which has quite a lengthy cftransaction in it with quite a lot insert queries and the error was:
Branch target offset too large for short

I had to split the code in 2 pages and moved transactions in and include page though I am against having an include page in cfc but for time being wanted this code to work, found an article related to this problem here:
Branch offset error

I am very amazed that this error is in Cold fusion from CF7 and CF9 still throws the same error.

I will try to ask the solutions from ColdFusion Gurus.

Finding file extension in SQL

Here is the SQL code to find the extension of a file:

declare @appurl varchar(50)
set @appurl= reverse('philip.singh.bedi.doc')

select reverse(LEFT(@appurl, CHARINDEX('.', @appurl) - 1)) ext,
reverse(RIGHT(@appurl, LEN(@appurl) - CHARINDEX('.', @appurl))) fname

Monday, 31 May 2010

Few Handy Javascript functions for HTML forms

Here are few handy javascript function, which I use on day today basis in my Web development:

// Returns string after trimming spaces from both sides
function AllTrim(str)
{
str = LTrim(str);
str = RTrim(str);
return str;
}
//Returns string after trimming spaces from left side
function LTrim(str)
{
return str.replace(/^\s+/g,'');
}
//Returns string after trimming spaces from right side
function RTrim(str)
{
return str.replace(/\s+$/g,'');
}
// validates email form field, if you pass true, it checks for empty field as well
function checkEmail(str, required)
{
regexPattern = /^[a-zA-Z_0-9-]+(\.[a-zA-Z_0-9-]+)*@([a-zA-Z_0-9-]+\.)+[a-zA-Z]{2,7}$/;
str = AllTrim(str);
if (required == 'undefined' || required )
{
if( str.length == 0 )
{
return false;
}
}
else
{
if( str.length == 0 )
{
return true;
}
}
return regexPattern.test(str);
}
// returns selected radio button value from a group of radio buttons in a form
function getSelectedRadioValue(formObj, obj)
{
var selected_radio_val = '';
for (var i=0; i < document[formObj][obj].length; i++)
{
if (document[formObj][obj][i].checked)
{
selected_radio_val = document[formObj][obj][i].value;
break;
}
}
return selected_radio_val;
}

Saturday, 29 May 2010

Coldfusion 8 Query feature

This post is the extension of my earlier post - 10 March 2009

Actually I wrote about getting Identity column value, when inserting a new record in MSSQL data base. but few days ago I found out from Ben Forta's blog, here is the link to that blog and content:

If you are using a database table with an identity (auto-increment) field, ColdFusion 8 can automatically return the newly created field value for you, without needing a trigger or a subsequent . All you need to do is look in the optional RESULT structure, and if available the value will just be there. This feature is very DBMS and driver specific (and unfortunately does not seem to be supported by Apache Derby), and the name of the structure member containing the generated value is different based on the DBMS being used. Here are the ones you should be aware of:

* SQL Server: result.IDENTITYCOL
* Oracle: result.ROWID
* Sybase: result.SYB_IDENTITY
* Informix: result.SERIAL_COL
* DB2: result.KEY_VALUE
* MySQL: result.GENERATED_KEY (MySQL 4 and 5 only, MySQL 3 does not support this feature)

Ben Forta's Article link

Upgrade to Flex 3.5 - removes html templates files

I came across the problem when I upgraded my Eclipse Flex Builder Plugin to use Flex 3.5 SDK.

When I was using clean my project option, it was removing html-template folders content, and solution is (I found a solution on web from one blog/ article):

Go to your project's properties (right click, Properties)
Go to Flex Compiler
Under "Html wrapper" un-check "Generate HTML wrapper file" Click "Apply"
Then check "Generate HTML wrapper file" (the same one you just unchecked)
Click "Apply"
You should now see that the html wrapper files are regenerated.

This happened to me when I used the clean option on one of my projects.

Thursday, 27 May 2010

How to find Function, Stored Proc, Table, View Details

In Microsoft SQL Enterprise Manager

Open The query Tab for the DB

Write the object name (just name without DBO etc)

Select the object name and press Alt + F1

Will list all information related to that object
i.e. For function

Will list
1) Creation /owner etc details
2) Output details with type etc
3) Input needed by that function

Sunday, 23 May 2010

Configuring Secure Virtual Host on Mac OS X

I had requirement to test my Flex Application, which I build for Raileasy in Secure environment.
It was quite difficult to configure my Mac, as I couldn't find a good post/ Blog or any article on it.
I asked few of my friends, who are using Mac for their development work and only Andy Allan gave me few tips and links:

Following are the articles helped me to set-up my Mac:
1) Mark Liyanage - article on Configuring mod_ssl on Mac OS X

2) Generating an SSL Certificate with Apache+mod_ssl

Here are the steps I took to configure my Mac (which are based on above articles):
First Open a terminal window and type in these commands:
  • sudo -s
  • cd /etc/apache2
  • mkdir ssl
  • chmod 700 ssl
  • cd ssl
  • gzip -c --best /var/log/system.log > random.dat
    (This step will create a file with the name and zip the file, which we will use to generate key)
  • openssl rand -rand file:random.dat 0

I was looking for a certificate to put on my local machine (which is self signed certificate) and to get that, here are the steps I took:
Issue following command in the already opened terminal window (which should be all in one line):

Before run the command get following questions answers ready:
***********
* Country Name (2 letter code) [AU]:GB
* State or Province Name (full name) [Some-State]:London
* Locality Name (eg, city) []:London
* Organization Name (eg, company) [Internet Widgits Pty Ltd]:Dev Co.
* Organizational Unit Name (eg, section) []:Development
* Common Name (eg, YOUR name) []:www.yourlocal.com
* Email Address []:admin@yourlocal.com
(It's important that you enter the host name of your web server exactly as it will be used later on in the "Common Name" field, like www.yourlocal.com or ssl.yourlocal.com.)
***********
COMMAND to run in terminal window:
openssl req -keyout privkey-2010.pem -newkey rsa:1024 -nodes -x509 -days 365 -out cert-2010.pem

Make sure that "TextEdit" is not running, then type these lines into the terminal window:
  • chmod 600 privkey-2001.pem
  • chown root privkey-2001.pem

On Mac Snow - Apache comes with default config file for SSL
Open following files in any text editor

/etc/apache2/httpd.conf (main config file for Apache)
/etc/apache2/httpd-ssl.conf

1) In ssl.config file look for
VirtualHost definition
You would see like this:
<VirtualHost _default_:443>

But above setting didn't work for me, I had to change it to like this, and I don't know the reason though, but it worked:
<VirtualHost www.yourlocal.com:443>

Change the DocumentRoot to the right root for your web site.
You might need to Add Directory access rights for the document root:
<Directory /sites/yoursite/wwwroot>
allow from all
Options +Indexes
</Directory>

Find the following and change them with right path and file name:
SSLCertificateFile "/etc/apache2/ssl/cert-2001.pem"

Save the file

You need to un-comment following line in httpd.conf file
#Include /private/etc/apache2/extra/httpd-ssl.conf

Save the file

from terminal window

run pwd command and make sure you are at
/etc/apache2/

run following commands:
apachectl stop
apachectl start
Now your server will provide secure access to your website.

The one thing I didn't understand was, by doing tis, all of my local website turned into secure websites.

But I was able to test my website under secure environment.

Thanks to the writers of above articles.

:)