Thursday, 12 September 2013

Flex HTML ToolTip Component

To enhance the normal tool tip functionality to have html style break/ font weight for a portion of string:

You need to create a action class like this:
package com.philip
{
import mx.containers.*;
import mx.controls.Text;
import mx.controls.ToolTip;
import mx.core.*;

public class HTMLToolTip extends ToolTip
{
public function HTMLToolTip()
{    super(); }

override protected function commitProperties():void{
super.commitProperties();
textField.htmlText = text;
}
}
}

to use this set this in your main component, call this function on creationComplete:

<![CDATA[
import com.*;
private function init():void{
ToolTipManager.toolTipClass = HTMLToolTip;
myBtn.toolTip = "this is HTMLToolTip."

]]>


The original post has strong tag but that didn’t work for me in Flex 3.5 SDK worked fine


Link to the original post

Wednesday, 4 September 2013

How to configure Railo – Tomcat – Apache on MAC Lion Mountain 10.8

Last week I updated my operating system from Snow Leopard  to Lion Mountain 10.8, system has upgraded itself.

Only two problems I faced:

1) Little Snitch got removed (V 2.2), I had to buy Licence for upgrade of version 3.02 – Lion cost me more :(

2) I had ColdFusion 9.01, which stopped working as Lion upgrade had reinstalled Apache removed old httpd.conf and httpd-vhost.conf files (actually renamed them as httpd.conf~previous.

I tried to move virtual sites from old to new but it didn’t work.

Web Sharing option got removed from System Preference - To get it back I found this post which provides a tool to get it in Sys Pref under Other:

Explanation, good article to read: Restore Web Sharing in Mountain Lion

Get the tool from here: WEB SHARING IN OS X MOUNTAIN LION

I made few changes to Apache config files, by default it uses web server document folder here:

/Library/WebServer/Documents

I have changed this and few other settings in httpd.conf (/private/etc/apache2/)

1) Find ServerAdmin and change email address to yours one (around line no 153)

2) Find ServerName and change it to cfdev also add following in hosts file (/private/etc/)

127.0.0.1 cfdev  (now you can get to your webserver by localhoost/ cfdev/ 127.0.0.1)

Make sure you uncomment this line (at line no 481) Include /private/etc/apache2/extra/httpd-vhosts.conf

3) create a folder sites or whatever name you waant to give at root level

4) Find DocumentRoot (line no 169) and change it to “/sites”

5) Find < Directory and change it with “/sites”

6) Open file httpd-vhost.conf from /private/etc/apache2/extra/

7) Uncomment NameVirtualHost *:80 (Line no 19)

8) Add following virtual host (default) site


DocumentRoot “/sites”
ServerName cfdev
DirectoryIndex index.html


9) Add / Create index.html in /sites folder as a place holder

10) sudo apachectl restart (to pick-up the changes

now open browser and browse http://cfdev or http://localhost and you should see your default web page

Railo Installation:

Download your railo installer from here

Scroll down and pick MacOS installer infront of Railo Server with Tomcat 7 title

Open it up and follow the default steps:

It will normally Install under this location and picks port 8080 – /Library/Railo/tomcat/

now if you browse http://localhost:8080/ you should see the tomcat page

1) Open web.xml from tomcat/conf folder

Add following at around line 422 (This will help if you use CFWheels frame-work


GlobalCFMLServlet
/rewrite.cfm/*


2) Open server.xml from tomcat/conf

3) go to line no 90 and un comment following:


This will help us to use apache server on port 80 to create virtual sites.

at around line 123 you will see default website for this Tomcat server

create a folder under /sites folder – which will be your first local site say – firstSite

inside the folder create index.cfm

now create a virtual site in server.xml like this: (above
)
unpackWARs=”true” autoDeploy=”true”
xmlValidation=”false” xmlNamespaceAware=”false”>


save the file and restart the server (Tomcat):

4) open terminal window and go to /Library/Railo/tomcat/bin

run following command: sudo sh shutdown.sh (to shutdown the server)

Now run this command to start it: sudo sh startup.sh

5) add following in hosts file: 127.0.0.1 dev.firstsite.com

now browse http://dev.firstsite.com:8080 and you will see your first site index.cfm running

6) open httpd.conf from /private/etc/apache2/

add following (Thanks to Anuj Gakhar this post)


Allow from 127.0.0.1


ProxyPreserveHost On
ProxyPassMatch ^/flex2gateway/(.*)$ ajp://localhost:8009/flex2gateway/$
ProxyPassMatch ^/messagebroker/(.*)$ ajp://localhost:8009/messagebroker/$1
ProxyPassMatch ^/(.+\.cf[cm])(/.*)?$ ajp://localhost:8009/$1$2

now open httpd-vhosts.conf from /apache2/extra/ folder and add virtual site (key to this set up is you need to add virtual site pointing to the same folder with same url under both servers)


DocumentRoot /sites/firstSite
DirectoryIndex index.cfm

AllowOverride All
Order allow,deny
Allow from all
Options +Indexes

ErrorLog firstsite.error.log
LogLevel warn


restart your apache server and

browse http://dev.firstsite.com  and you should see your site running on port 80

How to resize and crop Image Using Coldfusion script

I had requirement on my site www.eventaway.com  to resize Image after uploaded by user in two sizes one for view page and one as thumbnail, I found some script on web and improved it to fit in my requirement. here it is. I expect this code will reside in a CFC function


var l = {}; // local struct

/* Read file  and we will resize and crop it to make 200×200 */

l.img = ImageRead(“path of the image to be resized”);

l.resizeOriginalFlag = 0;
If( l.img.height GT l.img.width )
{
If( l.img.height GT 200)
{
ImageResize( l.img,’200′,”);
l.resizeOriginalFlag = 1;
l.fromX = l.img.Height / 2 – 100;
ImageCrop(l.img,0,l.fromX,200,200);
}
}
else if( l.img.width GT l.img.height )
{
If( l.img.width GT 200 )
{
ImageResize( l.img, ”,’200′);
l.resizeOriginalFlag = 1;
l.fromY = l.img.Width / 2 – 100;
ImageCrop( l.img,l.fromY,0,200,200);
}
}
else
{
If( l.img.height GT 200)
{
ImageResize(l.img,’200′,”);
l.resizeOriginalFlag = 1;
ImageCrop(l.img,0,0,200,200);
}
}


source=”#l.img#”
destination=”
overwrite=”yes”>

<!— <cfdump format="”html”" output="”/sites/resize.html”" var="”#cfcatch#”"> —>


Where do you need to use javascript MV* framework

I like following while I was reading an article on javascript frameworks: I thought it is worth repeating:

So, where will you likely need an MV* framework and where won’t you?

If you’re writing an application that will likely only be communicating with an API or back-end data service, where much of the heavy lifting for viewing or manipulating that data will be occurring in the browser, you may find a JavaScript MV* framework useful.

Good examples of applications that fall into this category are GMail and Google Docs. These applications typically download a single payload containing all the scripts, stylesheets and markup users need for common tasks and then perform a lot of additional behavior in the background. It’s trivial to switch between reading an email or document to writing one and you don’t need to ask the application to render the whole page again at all.

If, however, you’re building an application that still relies on the server for most of the heavy-lifting of Views/pages and you’re just using a little JavaScript or jQuery to make things a little more interactive, an MV framework may be overkill. There certainly are complex Web applications where the partial rendering of views can* be coupled with a single-page application effectively, but for everything else, you may find yourself better sticking to a simpler setup.

Sunday, 11 November 2012

How to Write Long tweet and facebook status update using TweetFace

How to write Long tweet using www.TweetFace.co

Visit www.tweetface.co home page and click on the button "Sign in with Twitter" (Black Arrow)

This will take you to next screen, if you are logged in to Twitter, it will present following screen, which ask you to give permission to TweetFace to post tour tweet on Twitter, when you post from TweetFace. Click on to Authorise App button


otherwise will show the next screen.

here TweetFace send your request to Twitter on twitter website, Twitter present you a login screen, login with your Twitter username/ password. TweetFace don't have any login screen, It doesn't save your username/ password.

After successful login you will come to this screen:
Here Arrow 1: shows your details from Twitter - No of Tweets/ Followers/ Following/ Fav etc
Arrow 2: Shows you are connected to Twitter, if you have FaceBook account, then you can login using FaceBook and Tweetface can post on both social media platforms in one click.
Arrow 3: click to go to the next page where you can write/ format your post


To login to FaceBook after you logged in to twitter, click the "Signin with FaceBook" button as in following picture.

Now you will see the both radio button shown as selected.

Write screen: click near arrow and start typing
After typing the text select the text and click on font drop down and pick the right font for you, click on size and pick the font size as shown in next Image.

Now pick the colour to make it beautiful.

If you want to upload image, you can learn it through the video, which is under this page:


You can also add the video link (You tube link is only allowed) check the Arrow no 1 in following Picture.
Arrow no 2- where you can make selection, if you want to be specific, where you want to post to go.
When you are done, you can click the Post button - Arrow 3 to send your post to selected options.


The post procedure is almost similar on Mobile, only difference is, only one image can be attached to post and you can't place it at a specific location in the post. 

After posting the post, you will come to this screen.
in this page you can see few buttons at the bottom of your post.

Facebook button if you are logged in to FaceBook
reTweet button, you can re-tweet the post 
tweet button which opens Twitter window to RT the tweet
Follow button if you are logged in as Twitter user

On right side where red text is "Write new post", if you are logged in as Twitter user, you can click on "View My Tweets and you will be taken to following page, which shows all your tweets from Twitter.
View Time Line will show your timeline from Twitter
View Mentions will show all your mentions.

From everywhere you can Reply and RT those tweets of Twitter too.


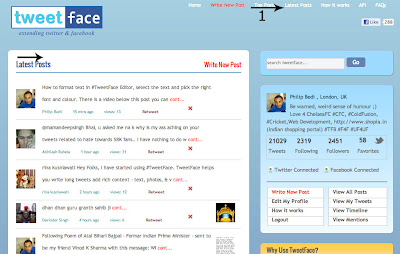
Top links as in following picture, 
1) Home, will take you to your post on this sites,
2) Write new Post
3) Top Posts, - Highly viewed post on this site
4) Lates Post - Latest post on this site by any user
5) How it works 
6) We offer API for our functionality - available for Mobile/ Desk Top Apps
7) FAQ - frequently asked questions


Tuesday, 29 June 2010

HTML5 and touch phone devices

Here is the first (I think) framework for Mobile phone (touch) devices, I need to explore more on this and will post in detail soon.

http://www.sencha.com/

Sencha Touch allows your web apps to look and feel like native apps. Beautiful user interface components and rich data management, all powered by the latest HTML5 and CSS3 web standards and ready for Android and Apple iOS devices. Keep them web-based or wrap them for distribution on mobile app stores

Friday, 18 June 2010

Abobe Flex ArrayCollection Sort

This is a inbuilt functionality, which I used to sort the ArrayCollection.
I just wanted to put it here so this can be handy for my reference, ;)

public var availableRegions:ArrayCollection = new ArrayCollection();
/* Create the SortField object for the "data" field in the ArrayCollection object, and make sure we do a numeric sort. */
var dataSortField:SortField = new SortField();
dataSortField.name = "name";
dataSortField.caseInsensitive = true;

/* Create the Sort object and add the SortField object created earlier to the array of fields to sort on. */
var regionDataSort:Sort = new Sort();
regionDataSort.fields = [dataSortField];

/* Set the ArrayCollection object's sort property to our custom sort, and refresh the ArrayCollection. */
availableRegions.sort = regionDataSort;
availableRegions.refresh();